


Agent vs agentless IT Asset Management (ITAM) is one of many debates that every IT professional needs to understand before choosing an IT Asset Management solution. Why? Because managing your IT assets is critical for better decision-making, operational efficiency, and cost optimization.
So, where does this debate begin? What exactly is agent-based ITAM and agentless-based ITAM? And more importantly, what should we expect from each one? Well, we're here to sort this out, clarify concepts, and help you understand the two options to their full extent. And let us be clear right from the beginning: there is no one option better than the other. Actually, a combination leads to better results.
So, in this blog post, we are going to cover this agent vs agentless IT Asset Management (ITAM) debate and some other important concepts, like what an agent is or what we understand when we talk about agentless discovery. Ready? Let's dive in!
InvGate Asset Management: 5-minutes Demo

What is agent-based IT Asset Management?
Agent-based IT Asset Management refers to a method of managing and tracking software and hardware assets by deploying agents that collect real-time data. This approach excels in providing granular insights, enhancing compliance, and optimizing resource utilization.
The ultimate goal is to use the data they extract to map the IT infrastructure and create an up-to-date asset inventory. This depth of detail empowers better decision-making and operational efficiency, distinguishing agent-based ITAM from agentless approaches.
What is an ITAM agent?
Understanding agent-based ITAM hinges on this concept, so here’s a clear definition. An ITAM agent is a piece of software installed directly on an asset (such as a computer) to facilitate data collection and management. Its primary function is to continuously monitor and report on various attributes of the device, including hardware specifications, installed software, usage patterns, and more.
Agents work in the background, requiring minimal manual intervention once deployed. They can track granular details like software license usage or even detect unauthorized applications, helping organizations maintain compliance and optimize resources.
Benefits of an IT Asset Management agent
#1: Real-time monitoring
It provides real-time visibility into the status, performance, and utilization of IT assets. If something changes, it will be automatically recorded, ensuring IT teams can respond swiftly to any issues or updates.
#2: Automated data collection
Automating the process of data collection reduces manual effort and minimizes the risk of human error. By periodically collecting data from devices, agents create a precise and detailed inventory, freeing up IT personnel to focus on strategic tasks.
#3: Accurate inventory
Agents continuously collect and update asset data, ensuring accurate inventories and reducing inconsistencies. This helps prevent discrepancies between the actual state of assets and the information stored in the ITAM system, supporting compliance and informed decision-making.
#4: Comprehensive asset tracking
Agents can monitor assets both within and outside the organization's network, including remote and mobile devices. This capability provides a holistic view of the entire IT infrastructure, making it particularly useful for organizations with multi-site operations or extensive remote work policies.
Recommended reading
Read Article
Automated Asset Tracking: Why You Need it And How to do it Right
Disadvantages of an ITAM agent
#1: Deployment and maintenance
Agents require installation and ongoing maintenance on individual devices. This process can be time-consuming and resource-intensive, especially in large-scale environments where hundreds or thousands of devices are involved.
#2: Compatibility and performance impact
Some agents may have compatibility issues with certain operating systems or applications. Additionally, poorly optimized agents can consume system resources, potentially impacting device performance.
#3: Limited visibility for unmanaged devices
There are certain devices where the agent can’t be installed—either due to hardware limitations or ownership (e.g., employee-owned devices). This limitation means such assets may remain untracked unless alternative ITAM methods, such as agentless discovery, are employed. This is why agentless methods can serve as a valuable complement in a comprehensive ITAM strategy.
Save hours of searching with IT Pulse - Our free IT newsletter
Every Friday, receive the latest news of the IT world right in your inbox.
Read about our privacy policy
What is agentless ITAM?
Agentless IT Asset Management consists of managing and tracking software and hardware assets through network scanning and remote data collection techniques to gather information about the assets.
In ITAM, "agentless" means that there are no dedicated software agents installed on individual devices to collect asset data. Instead, the ITAM system interacts with the devices remotely, leveraging network protocols, APIs (Application Programming Interfaces), or other methods to obtain information.
Agentless ITAM focuses on gathering data from network endpoints and infrastructure devices:
- Servers.
- Network switches.
- Routers.
- Storage systems.
- Printers.
- Scanners.
- IoT devices.
It typically involves scanning the network to discover and identify devices, and then retrieving asset data using standardized protocols and technologies, such as SNMP (Simple Network Management Protocol) or WMI (Windows Management Instrumentation). This process is known as agentless discovery.
What is agentless discovery?
Agentless discovery refers to the ability to locate and identify assets on a network without installing software agents on the devices. By using methods such as IP range scanning, network protocol analysis, or integrations with existing systems, it allows organizations to quickly map their IT environment and identify unmanaged or unknown assets.
This capability is particularly beneficial for agentless network discovery, which focuses on network infrastructure devices like routers, switches, and firewalls. These assets often cannot support agent installation but are critical to include in the ITAM inventory.
Another aspect is agentless asset discovery, which expands the scope to endpoints, virtual machines, and other devices connected to the network. This approach ensures a broader and more inclusive understanding of the IT ecosystem, especially in environments with mixed asset types.
By leveraging agentless methods alongside agent-based ones, organizations can achieve a more comprehensive ITAM strategy, adapting to both technical limitations and operational requirements.

Recommended reading
Read Article
InvGate Asset Management Discovery Now Supports Agentless Discovery for Windows Devices
Pros of agentless monitoring
#1: Ease of deployment
As it does not require the installation and maintenance of software agents on individual devices, agentless monitoring simplifies the deployment process and reduces the associated administrative overhead.
#2: Scalability
Agentless monitoring can be easily scaled. Network scanning techniques allow organizations to discover and monitor a wide and diverse range of devices across their infrastructure.
#3: Non-intrusive
This method does not impact the performance or behavior of the devices being monitored since there are no agents running on them.
#4: Extended coverage
It can provide visibility into devices that may not support or allow agent installation, such as network devices, printers, or legacy systems. This enables organizations to have a more comprehensive view of their IT assets.
Cons of agentless monitoring
#1: Limited granularity
Agentless monitoring may provide less granular and detailed information compared to agent-based monitoring. Certain asset attributes, such as software usage metrics or detailed hardware configurations, can be more challenging to obtain.
#2: Dependency on network accessibility
As it relies on network connectivity and access to devices, if devices are offline, firewalled, or located in remote environments, collecting asset data may be more challenging or impossible.
#3: Reliance on standardized protocols
This method depends on the availability and support of standardized protocols, such as SNMP or WMI. If devices do not support these protocols or have limited compatibility, gathering asset data may be limited or require alternative approaches.
#4: Data accuracy and timeliness
It relies on periodic scanning and data retrieval, which means that the collected data may not always be real-time, and there is a potential for inaccuracies due to network latency or device configuration changes between scans.
Agent vs. agentless: Which is better?
While both agent-based and agentless approaches to ITAM have benefits, the winning method must combine both. This makes up a more extensive and adaptable ITAM solution, prepared to respond to a wide range of scenarios.
Here are the reasons why combining agent-based and agentless monitoring is advantageous:
| Agent | Agentless | |
| Coverage and visibility |
|
|
| Flexibility and scalability |
Ideal for:
|
Ideal for:
|
| Data accuracy and timeliness |
|
|
| Compliance and security |
Provides detailed insights into:
|
|
As you can see, combining agent-based and agentless ITAM monitoring maximizes coverage, flexibility, and data accuracy. Basically, it provides a comprehensive view of the IT infrastructure.
How InvGate Asset Management’s Agent works

InvGate Asset Management offers both agent-based and agentless alternatives to truly empower users and adapt to their specific company needs. By being able to choose, they can leverage the coverage of agentless ITAM software while obtaining the detailed information only an agent can provide from key assets.
InvGate's Agent is designed to facilitate data collection and monitor the devices where it’s installed. It is a vital component of our software, as it can help your organization to:
- Gather accurate and real-time asset data.
- Enhance visibility.
- Control the IT infrastructure.
- Support effective ITAM practices.
What operating systems is the InvGate Agent available for?
InvGate Asset Management's Agent is available for the following operating systems:
- Windows XP onwards.
- Windows Server 2003 onwards.
- Ubuntu 12.04 onwards.
- Debian 8 onwards.
- CentOS 7 onwards.
- RHEL 7 onwards.
- Oracle Linux 6/7.
- macOS 10.13 (High Sierra) onwards.
- Android 5.0 onwards.
Agent Deployment
InvGate Asset Management's Agent can be installed manually and remotely on Windows, Linux, and macOS, as well as through GPO for Windows operating systems (you can find this information in the Active Directory).
The agent deployment process is simple:
- Log into your InvGate Asset Management instance as an Administrator.
- Go to Settings >> Network >> Agent Deployment.
- Select the operating system and method of installation.
If concerned about the resources the Agent utilizes (and how that might affect your organization’s asset performance), don’t worry. InvGate’s Agent weighs 23MB, which maintains a service that consumes less than 10MB of RAM. It’s designed to pull out information with minimal resources. It scans assets every 4-12 hours, and transfers an encrypted package of less than 100kb.
How does the Agent work within InvGate Asset Management?
When an Agent is installed, it gets assigned an AgentID to identify it. This links the asset to your InvGate Asset Management inventory. From the moment the Agent is installed, it reports to the InvGate Asset Management server every 8 to 12 hours. Each time it submits an inventory, the date and time of the following report is automatically calculated. If the computer is turned off, the Agent will send the inventory as soon as the computer is back on.
Overall, it collects critical data to report to your instance. This includes:
- Device status.
- Installed hardware.
- Installed software.
- Operating system information.
- Logged-in users.
- Network information.
- Geolocation (Windows 10 onwards).
How to use InvGate Asset Management without the Agent
InvGate Asset Management's Discovery feature creates an automated and unattended inventory of all the devices connected to your organization’s network. Of course, it doesn’t require an installed agent to work, but keep in mind that it won’t map assets outside your physical premises (remote workers’ laptops, for instance).
You can automate the feature to scan the network periodically, and add to your IT inventory only the assets you’re interested in. Once they’re in, make sure to include them into the CMDB (Configuration Management Database).
It is particularly helpful to discover network-connected devices on which the Agent does or can not run, such as printers, switches, routers, IP phones, etc. Plus, it’s a great way to detect shadow IT and keep your network safe. However, for computers, we encourage you to install the Agent since it provides more information.
How does Discovery work?
Discovery is the first step to automating the IT device inventory process. To do so, you need to contact all the IPs specified in the InvGate Discovery configuration and identify which ones are active through a series of protocols, including at least DNS, ICMP, mDNS, NetBIOS, SNMPv1, SNMPv2c, SNMPv3, TCP, and UPnP. The collected data will be used to detect the following information:
- Device name.
- Device type.
- IP address.
- MAC address.
- Manufacturer.
- Model.
- Serial number.
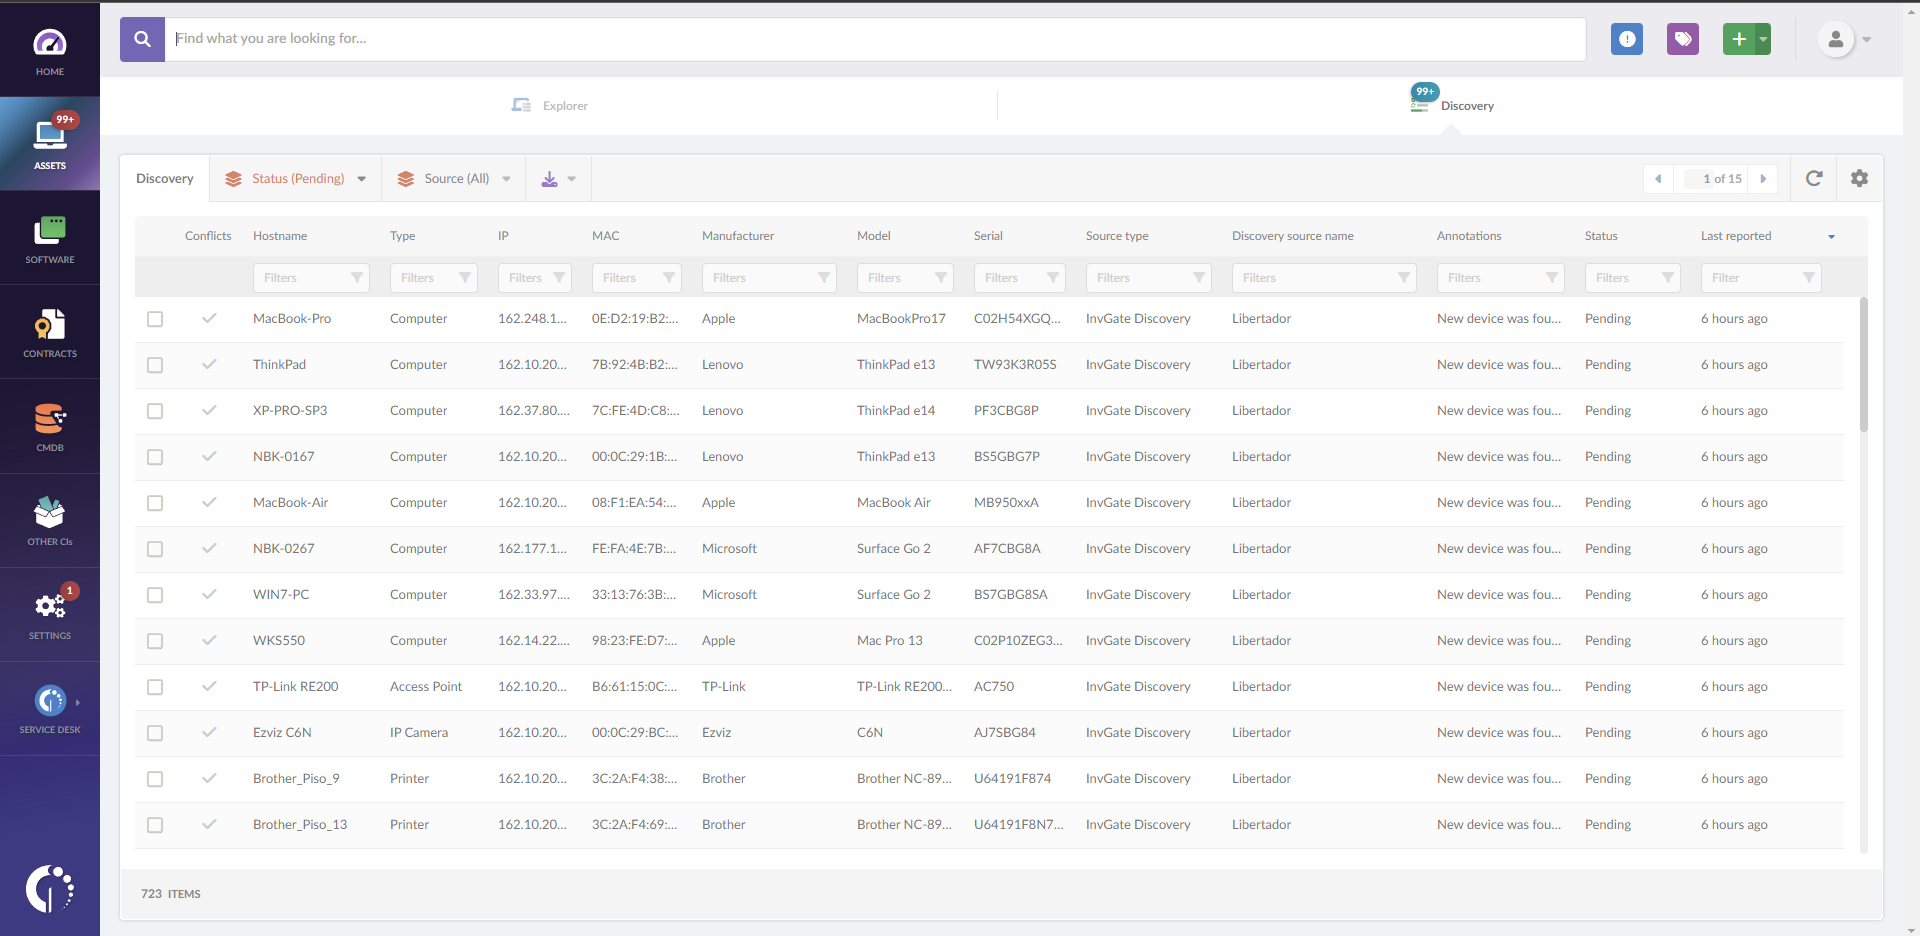
How can you see the results?
As simple as it sounds, you can access all found devices in the “Discovery” tab within the “Assets” section. Here, you will be able to find the following data to identify and convert the devices to assets:
- Hostname.
- IP.
- MAC address.
- Source Type and Discovery source name.
- Annotations.
- Status.
In this section, you can also resolve conflicts, ignore assets, generate an inventory item from the discovered devices, and approve the devices that were categorized as “not secure.”
Once the asset is found, the device status can be:
- Pending - This is the initial status of discovered devices. Once marked as pending, you can convert them to assets in your inventory.
- Ignored - Ignoring a device means that it won’t be turned into an asset. However, they can go back to “Pending” if you want to pay attention to them again or add them to your inventory.
- Processing - This is the status of devices in the process of being converted to assets.
You can also track all the previous logs in your instance and get an overview of the latest scans by going to Settings >> Network >> Discovery sources and clicking on "Logs."
Converting a discovered device into an asset
To add a “Pending” asset to your inventory, you must follow these steps:
- Choose a device.
- Press the “Convert to Asset” button.
- A menu will show up on the right margin, which will allow you to fill in the rest of the asset information.
- Press the “Apply” button.
Asset view
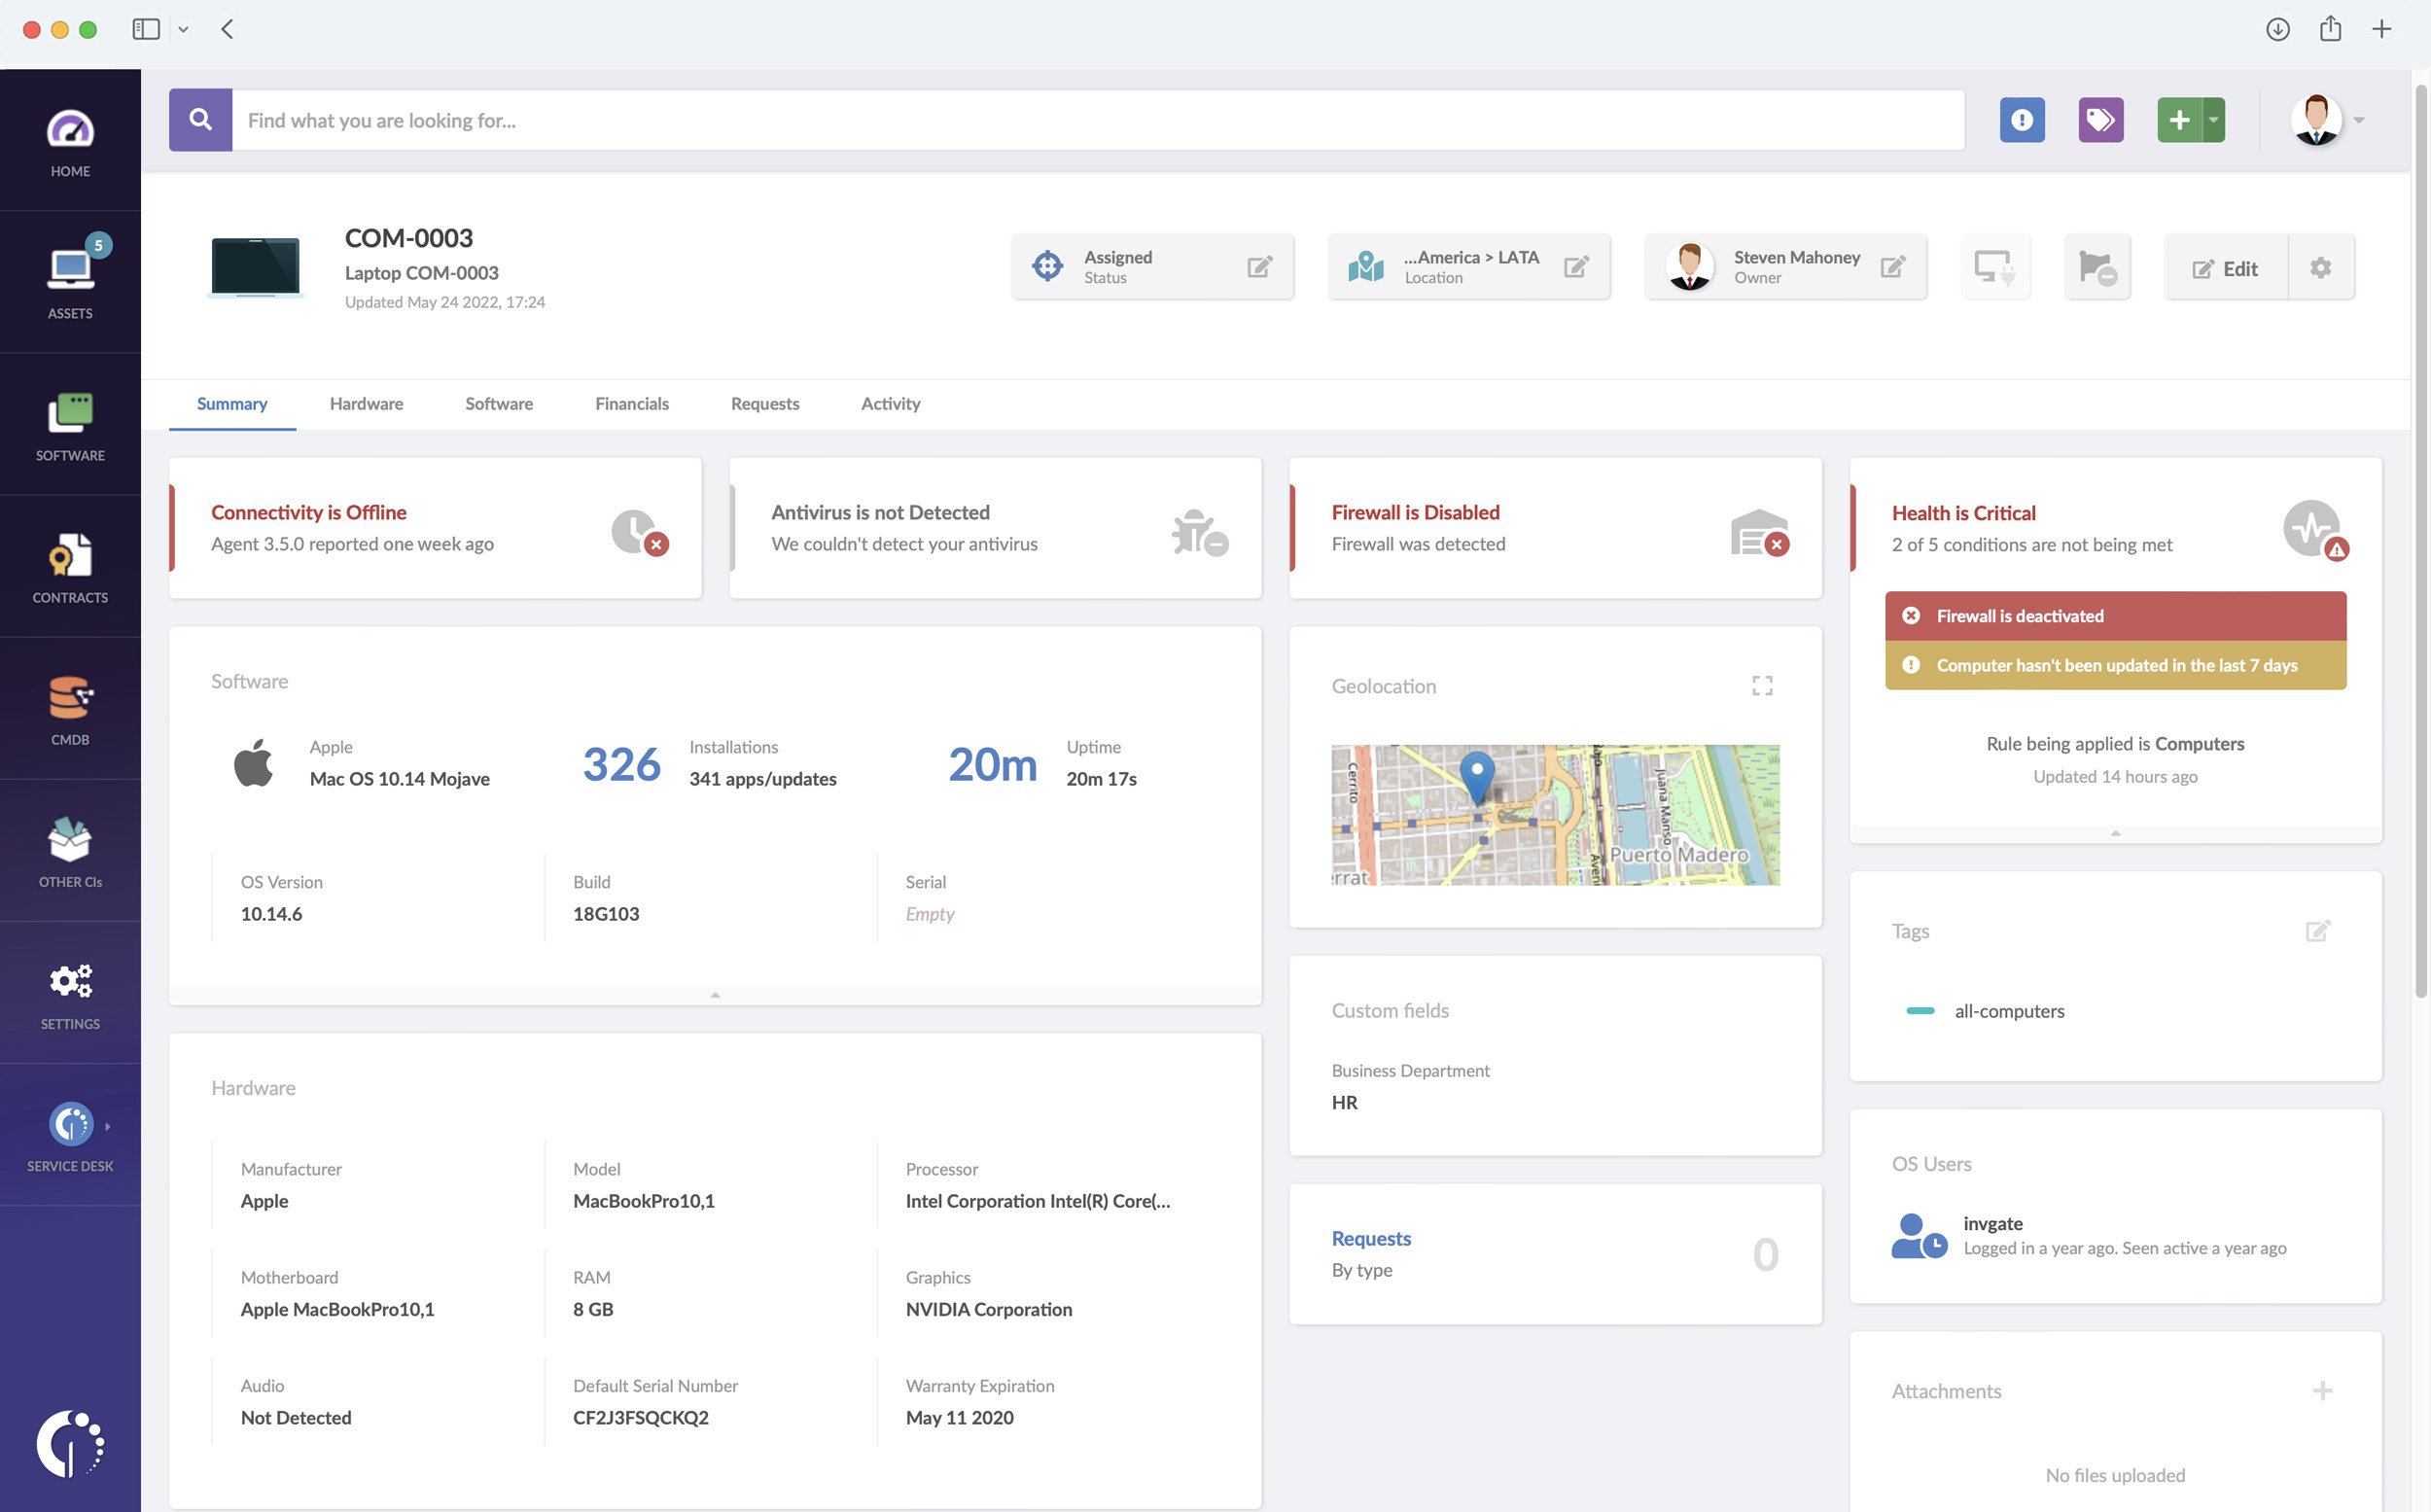
Once the discovered device has been converted to an asset, go to the “Explorer” tab within the “Assets” section to see its profile. To access the profile, click on the asset’s name. The “Summary” tab can contain the following information:
- Asset details - Name, description, object identifier, manufacturer, model, IPv4, MAC address, serial number.
- Location - Indicates the asset location. This information is assigned manually in the
- Device.
- Contact - Indicates the name, phone number or email address to contact the user or
- department responsible for the asset. This information is assigned manually in the
- Device.
- Requests - Status of open requests, linked via InvGate Service Management.
- Tags - Tags assigned to the asset.
- And more!
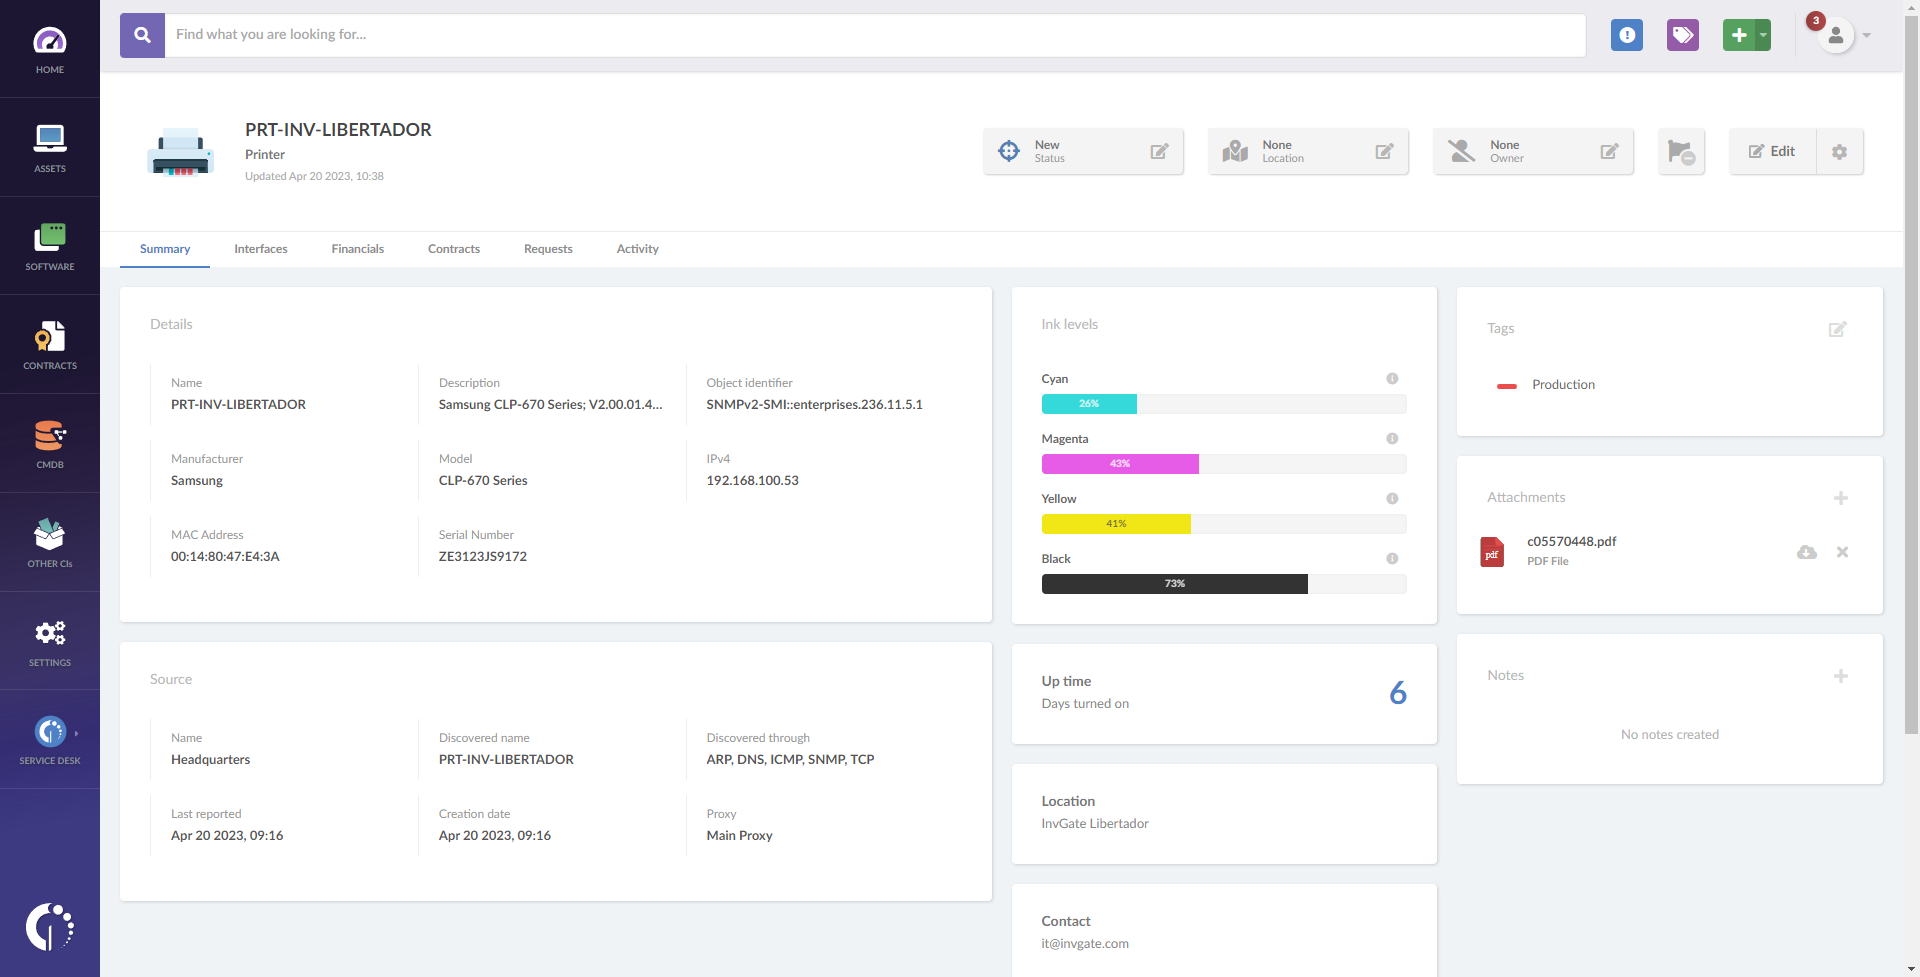
In the case of printers, the “Ink levels” box shows the percentage of remaining ink. Click on the icon to view the color codes and the serial numbers:
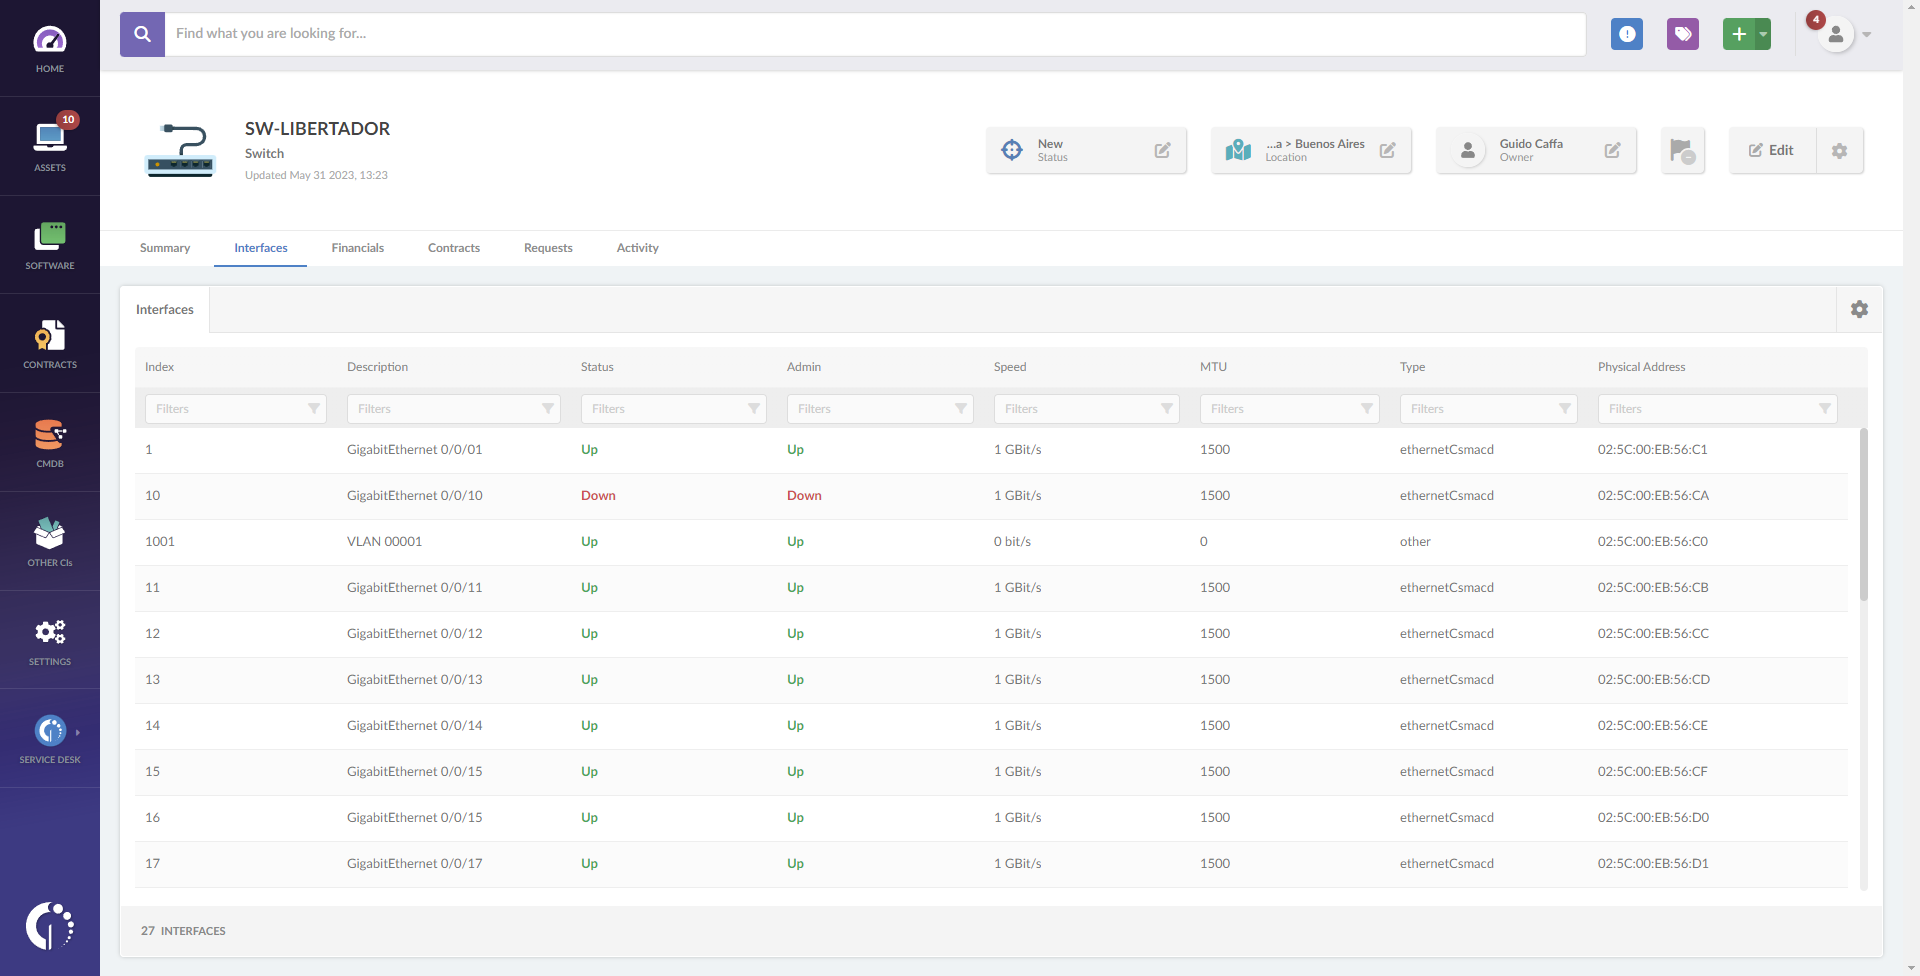
In addition, the “Interfaces” tab can provide detailed information on the asset interfaces:
- Description - Interface description.
- Status - Indicates whether the interface is active or not.
- Index - Index assigned to the interface.
- Admin - Indicates whether the interface administration is active or not.
- Type - Type of interface.
- Physical address - MAC address of the interface.
- And more!
Wrapping up
Agent-based monitoring excels at providing real-time data and detailed insights into assets with an agent installed. Meanwhile, agentless monitoring offers a broader reach, capturing information from devices that can’t support agents.
But here’s the bottom line: the true power of IT Asset Management lies in combining both approaches. By leveraging agent-based monitoring for granular details and agentless discovery for broader coverage, you’ll have a comprehensive view of your IT ecosystem. This hybrid strategy ensures better compliance, enhanced security, and the flexibility to manage diverse and evolving environments.
Ready to see this dual approach in action? Try InvGate Asset Management’s 30-day free trial and discover how seamlessly you can manage your IT assets with the perfect balance of depth and breadth. No data loss, no strings attached—just a smarter way to handle ITAM!

