


Every incident goes through a series of stages before it’s resolved. It starts when an issue is reported, moves through diagnosis and resolution, and ends once the service is fully restored. That sequence is known as the Incident Management lifecycle.
Understanding how this lifecycle works is key to managing IT incidents efficiently. It gives structure to what could otherwise feel like a constant rush of unrelated requests, helping teams organize, prioritize, and act in a consistent way.
In this article, we’ll walk through each part of the Incident Management lifecycle, explain why it’s worth formalizing, and outline the main benefits it brings to IT teams and organizations.
In this article, we’ll break down what the Incident Management lifecycle is, why it’s crucial for your IT operations, and how you can implement it effectively using best practices like. So, grab a cup of coffee, sit back, and let’s dive into the world of Incident Management—minus the jargon and confusion!
Key takeaways
- The Incident Management lifecycle is the end-to-end sequence an IT team follows to detect, record, classify, prioritize, resolve, close, and review every incident.
- Skipping or rushing any stage — especially logging and post-incident review — creates recurring incidents that compound over time.
- Each stage has concrete inputs, outputs, and failure modes: understanding them makes the difference between a reactive service desk and a structured one.
- InvGate Service Management automates the most error-prone steps of the lifecycle — categorization, prioritization, SLA tracking, and escalation — without requiring code.
What is the Incident Management lifecycle in ITIL?
The ITIL Incident Management lifecycle refers to the sequence of activities an organization follows to handle incidents from detection to closure. It gives structure to how incidents are identified, categorized, prioritized, resolved, and reviewed.
The lifecycle defines how the service desk records these situations, assigns them for resolution, and restores normal service levels.
Before diving into the stages, one distinction is worth making: an incident is an unplanned interruption or degradation of an IT service. A problem is the underlying cause that produces one or more incidents. The lifecycle covered here applies to incidents — the immediate response and resolution loop. Problem Management runs in parallel, often triggered by patterns discovered during incident reviews, but it operates on a different timeline and with a different objective.
Understanding this boundary matters because it defines the scope of every stage that follows.

Recommended reading
Read Article
The Incident Management Process: Step-by-Step Guide
Why the incident lifecycle matters: What breaks without it
When teams operate without a defined incident lifecycle, the consequences are predictable:
- Inconsistent response: Different agents handle the same type of incident differently, making it impossible to improve the process or set reliable expectations.
- SLA breaches: Without prioritization rules and escalation triggers, high-impact incidents wait in the same queue as low-impact ones.
- No usable data: Poor logging and informal closures mean the ticket system holds records that can't support meaningful analysis — MTTR figures are unreliable, patterns go undetected, and recurring incidents get treated as new every time.
- Repeated failures: Without post-incident review, nothing closes the loop. The same root causes resurface, and the team spends its capacity responding instead of preventing.
A structured lifecycle doesn't eliminate incidents. It makes every incident an opportunity to reduce the next one.
7 steps in ITIL incident lifecycle
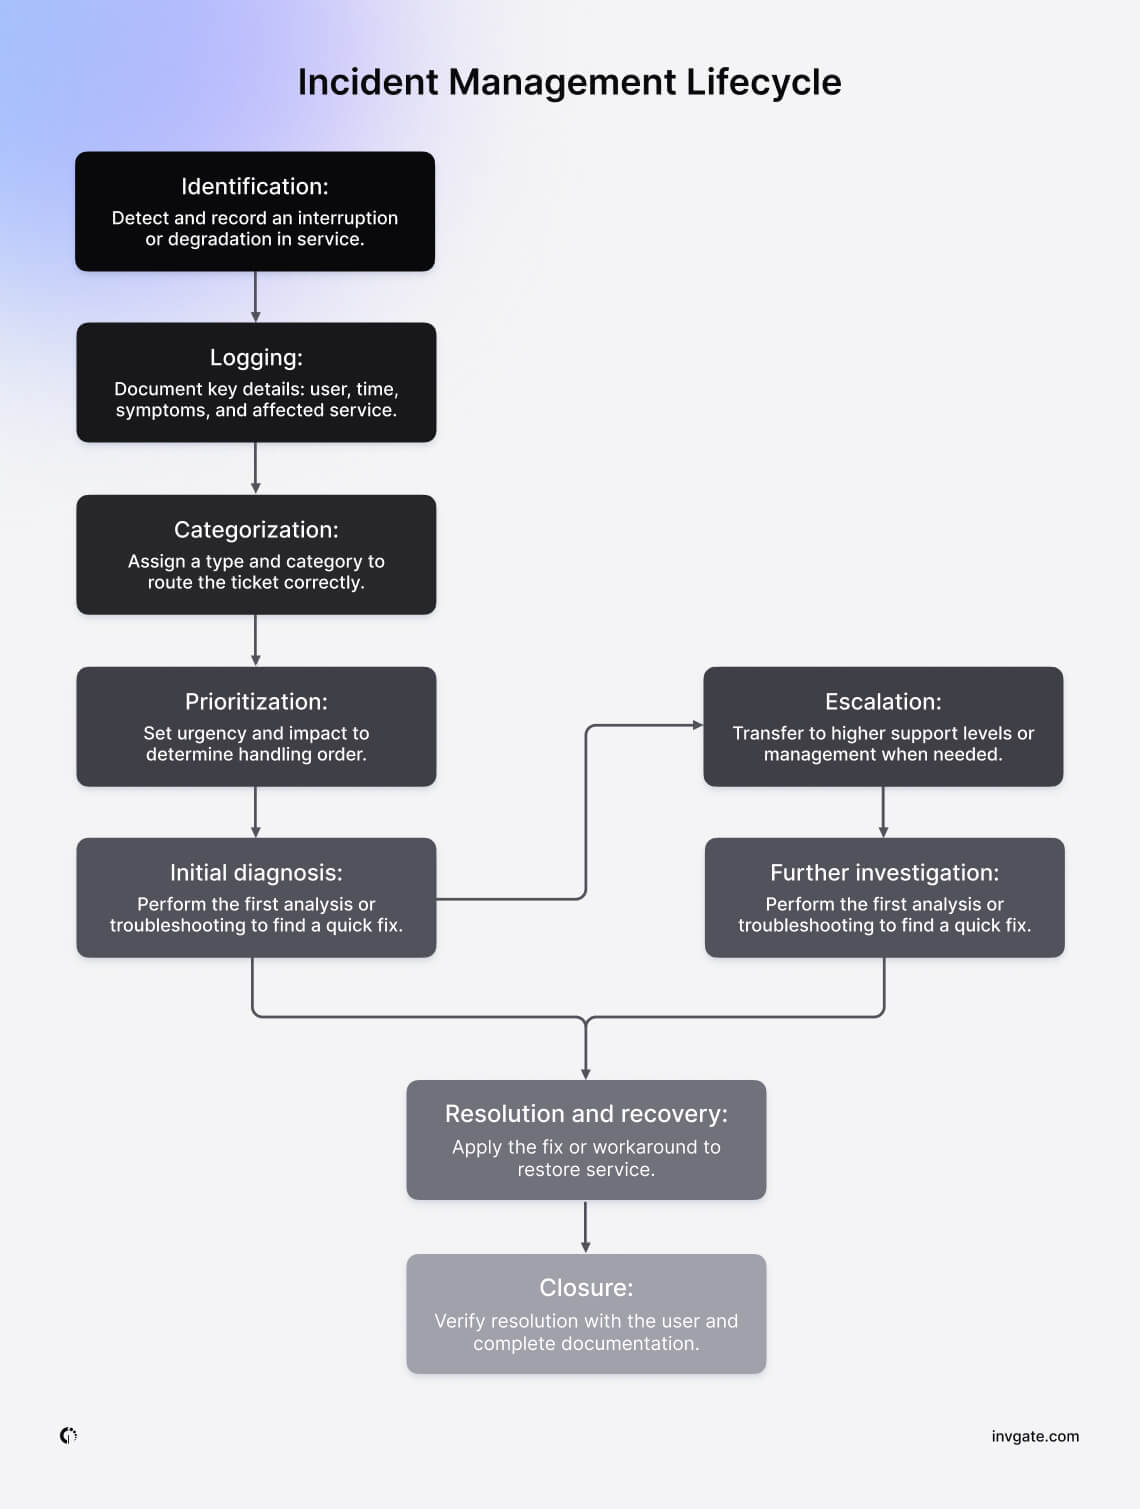
Let’s go through each stage of the ITIL Incident Management lifecycle, one by one. The process is often visualized as a flow that begins when an incident is reported and ends when it’s closed after confirmation from the user.
1. Detection and identification
The first step in the ITIL Incident lifecycle is Identification. This is where the incident is detected and reported.
Detection happens through three main channels:
- Automated monitoring alerts: The system flags anomalies before users notice them — server response times spike, a service becomes unreachable, error rates cross a threshold.
- User reports: A user submits a ticket or calls the help desk because something isn't working.
- Direct IT observation: A team member notices an issue during routine checks or while working on a related task.
Proactive detection via monitoring is always preferable to reactive detection via user reports. By the time users report an issue, the incident has already been affecting them for some time.
Part of this stage is also confirming that what's been detected is actually an incident — an unplanned service interruption — and not a service request, which follows a different workflow.
2. Logging
An incomplete ticket is a liability. When agents start investigating an incident without adequate information — who reported it, what service is affected, when it started, how many users are impacted — they spend the first portion of their diagnostic time gathering data that should have been captured at intake.
Every incident ticket should include, at minimum:
- Who reported it and how (portal, phone, email, automated alert)
- Which service or asset is affected
- A description of symptoms (not just "it's broken" — what specifically isn't working)
- Time of first occurrence or first report
- Initial estimated impact (one user, a team, a department, or the entire organization)
Consistency matters as much as completeness. Tickets that use different terminology for the same type of issue can't be aggregated into meaningful reports. If one agent logs a VPN failure as "network connectivity" and another logs it as "remote access," the data becomes fragmented. Good logging discipline at Stage 2 is what makes every downstream stage — from categorization to post-incident analysis — reliable.
3. Categorization
Categorization happens during ticket creation. The categories users select in the service portal, the forms they complete, and the service catalog structure all influence how incidents are classified from the moment they enter the system.
For that reason, effective categorization depends as much on service design as it does on agent decisions. A well-structured portal guides users toward the correct service or issue type, making routing and reporting more reliable. When categories are poorly designed, agents spend time reclassifying tickets, and reporting data becomes less useful over time.
The goal is to create categories that are detailed enough to support routing and trend analysis without becoming so granular that users and agents apply them inconsistently. Categories such as "Hardware > Printer," "Software > Email," or "Network > VPN" provide enough context to direct incidents to the right support group while still producing meaningful reporting.
Accurate categorization supports more than ticket assignment. It helps service desk managers identify recurring issues, analyze incident trends, and connect incidents to Problem Management activities. When teams consistently categorize incidents the same way, historical data becomes a reliable source for identifying root causes and service improvement opportunities.
With InvGate Service Management: Administrators can design service catalogs, forms, and portal categories that guide users toward the correct classification from the start. Automated routing rules can then use those categories to assign incidents to the appropriate team without manual intervention.
4. Prioritization
Not all incidents are equal, and treating them as if they are is one of the most common sources of SLA failure. When teams work through a queue by order of arrival rather than by impact, critical incidents wait behind low-impact ones, SLAs on high-priority items get breached, and urgency loses meaning.
ITIL defines priority as the product of two variables:
- Urgency: How quickly does this need to be resolved? Is the impact growing over time?
- Impact: How many users, processes, or business functions are affected?
In practice, this translates into a priority matrix: a grid that maps combinations of urgency and impact to predefined priority levels (P1 through P4, or Critical/High/Medium/Low), each with a corresponding SLA target.
The ITIL priority matrix operationalizes this model — defining what each cell of the matrix means for response time, escalation, and communication requirements. Closely related is the question of incident severity levels, which some organizations manage as a parallel dimension to priority, particularly for major incidents.
Priority must be visible to everyone working the queue — not just the assigned agent. Teams that can see relative priority across the entire incident board can make better decisions about who handles what, without relying on manual coordination.
5. Investigation, diagnosis, and resolution
This is the stage where the actual work of fixing the incident happens — but how efficiently it runs depends almost entirely on the quality of everything that came before it.
Tier 1 agents typically follow a defined set of first-response steps before escalating: checking the knowledge base for documented solutions or workarounds, applying basic troubleshooting steps, and confirming whether the issue is isolated or affecting multiple users. If Tier 1 cannot resolve within a defined time threshold, the incident escalates to Tier 2 or Tier 3.
Two distinctions matter throughout this stage:
- Workaround vs. resolution: A workaround restores service temporarily (rebooting a server, redirecting traffic to a backup system) but doesn't address the underlying cause. A resolution eliminates the cause. The ticket should document which one was applied.
- Functional escalation vs. hierarchical escalation: Functional escalation moves the ticket to a team with the technical expertise to handle it. Hierarchical escalation involves management when impact, duration, or visibility warrants it.
Asset data plays a significant supporting role here. Knowing which configuration item is affected — its history, its recent changes, its dependencies — often accelerates root cause identification considerably.
With InvGate Service Management: The integrated knowledge base lets agents access previous cases and documented solutions without leaving the ticket interface, reducing the time spent on issues that have been resolved before. Automatic escalation rules reassign the ticket to the next tier if there's no activity before the configured SLA threshold, ensuring that time spent at the wrong level doesn't silently drain the resolution window.
The platform also integrates with asset data from InvGate Asset Management, surfacing the history of the affected CI directly from within the ticket — a critical input for faster diagnosis. This is also where automated incident management capabilities have the most direct impact on resolution speed.

Recommended reading
Read Article
Ticket Escalation: What is it And How to Automate it in Your Help Desk
6. Closure
Closing a ticket sounds like an administrative formality. It isn't. How an incident is closed determines the quality of the data it generates — and that data is what the entire reporting layer of incident management runs on.
Formal closure requires:
- User confirmation that the service has been restored to their satisfaction, or a timeout protocol (if the user doesn't respond within N days, the ticket closes automatically with a prior notification)
- Resolution documentation: what was done, whether it was a workaround or a permanent fix, and what caused the incident
- Assessment of whether a Problem record should be opened: if the resolution was a workaround, or if this incident is part of a recurring pattern, it should trigger Problem Management
- Timestamp accuracy: the system should record both the resolution time and the formal closure time, as these feed directly into Incident Management metrics, like MTTR and SLA compliance calculations
7. Post-incident review
The post-incident review is the stage that, when formalized, can bring the most long-term value — because it's where the lifecycle data collected across all previous stages becomes actionable intelligence.
When to run a post-incident review:
- Mandatory for any major incident
- Recommended for incidents that caused an SLA breach
- Recommended for recurring incidents — the same category of issue appearing three or more times within a defined window
What a good review answers:
- When did the incident actually start versus when it was first detected? (Detection gap)
- At which stage did the team spend the most time? Where did the process slow down?
- Was the prioritization correct, or was the incident over- or under-prioritized relative to its actual impact?
- Was the resolution permanent, or was a workaround applied that left an underlying problem unresolved?
- Is there a pattern — across this incident and others like it — that warrants opening a Problem record?
It's worth distinguishing a post-incident review from a root cause analysis. A post-incident review is process-focused: it examines how the team managed the incident through the lifecycle. An RCA is technically focused: it investigates what caused the failure in the underlying system. Both are valuable, but they answer different questions. The post-incident review often triggers an RCA, but they aren't the same exercise.
The outputs of a review feed directly back into the system: knowledge base articles get updated, category taxonomies get refined, workflow rules get adjusted, and if warranted, a Problem record gets created to track the underlying cause to resolution.
How to manage the incident lifecycle with InvGate Service Management
Managing the incident lifecycle across disconnected tools creates its own problems. When detection happens in a monitoring tool, logging happens in a ticketing system, knowledge is stored in a separate wiki, and metrics live in a spreadsheet, the lifecycle is technically followed but practically fragmented. Handoffs between stages introduce delays, context gets lost between systems, and the data needed for post-incident review never aggregates cleanly.
Running the full lifecycle in a unified platform changes the operational dynamic. InvGate Service Management Management supports the lifecycle end-to-end as a single system:
- Workflow automation without code: Every stage transition — assignment, escalation, categorization, SLA clock, closure — can be automated through configurable rules that don't require development work. This removes the most error-prone manual steps from the process.
- SLA tracking: SLA timers run automatically from the moment a ticket is created. Escalation rules trigger before a breach occurs, not after, giving teams time to respond rather than recover.
- Centralized knowledge base: Agents access documented solutions and workarounds directly from the ticket interface, without switching context to an external system.
- AI for major incident detection: The platform can surface clusters of related tickets that indicate a potential major incident, allowing teams to escalate proactively before user impact accumulates.
- Dashboards for lifecycle performance: Incident volume, MTTR, SLA compliance, and escalation patterns are available in real time, providing the data foundation that makes post-incident review substantive rather than retrospective.
- Asset data integration: When InvGate Asset Management is connected, the configuration item affected by an incident is visible directly within the ticket — including its history and recent changes — accelerating diagnosis at Stage 5.
The result is a lifecycle where the stages connect: data captured at logging is available at diagnosis, SLA logic set at prioritization runs through to closure, and the metrics surfaced at post-incident review reflect what actually happened at every stage.
Want to see how InvGate Service Management supports your incident management lifecycle?The platform is certified by PeopleCert in ITIL best practices, including Incident Management. Start your 30-day free trial right now!
Common mistakes at each stage (and how to avoid them)
Even organizations with a documented Incident Management process make recurring mistakes. Most incidents are resolved eventually, but small breakdowns during detection, triage, investigation, or closure often create longer resolution times, unnecessary escalations, and repeated issues.
FAQs
What are the stages of the incident management lifecycle?
The incident management lifecycle consists of seven stages: detection and identification, logging and recording, classification and categorization, prioritization, investigation and resolution, closure, and post-incident review. Each stage produces inputs for the next, and the final review stage feeds back into process improvement for future incidents.
What is the difference between incident management lifecycle and incident management process?
The lifecycle defines what happens at each stage — the sequence of activities from detection to review. The process defines how those activities are carried out — the procedures, roles, responsibilities, and tools involved at each stage. The lifecycle is the framework; the process is the operational implementation.
When should you conduct a post-incident review?
A post-incident review is mandatory after any major incident. It's also strongly recommended after incidents that caused an SLA breach or that belong to a recurring pattern — the same category of issue appearing multiple times within a defined period. The review examines the process (how the incident was managed), not just the technical cause.
How does ITIL define priority in incident management?
ITIL calculates priority as a function of urgency (how quickly the issue needs to be resolved) and impact (how many users or business processes are affected). The combination maps to a priority level — typically P1 through P4 — each with defined response and resolution time targets. In practice, this is operationalized through a priority matrix that maps urgency-impact combinations to specific SLA requirements.

