


.jpg?upsize=true&upscale=true&width=622&height=351&name=how-to-create-a-service-level-agreement%20(1).jpg)
Knowing how to define an SLA is the first step to making those agreements work in practice. The sections below break down what you need to establish before creating an SLA and how to configure it in InvGate Service Management, where SLAs can do more than track time — helping automate actions, support escalation rules, and provide clear visibility into SLA compliance.
A service level agreement (SLA) sets clear expectations between IT and the business. It defines response and resolution targets, explains how support teams prioritize work, and gives stakeholders a shared reference point.
How to Implement SLAs to Deliver Consistent Service Across Your Business
How to write an SLA?
Writing a Service Level Agreement starts with alignment, not configuration. Before setting timers or rules in a tool, you need a shared understanding of what the service covers, how success is measured, and what the business actually expects from IT. An SLA works best when it reflects real operating conditions and clearly explains how support decisions are made.
To get there, you’ll need to define a few key elements upfront:
-
Scope of the SLA: Identify which services, request types, or processes are included. Clarify exclusions as well, so there’s no ambiguity later.
-
Priority model: Establish how impact and urgency combine to create priority levels, and make sure those definitions are consistent across teams. Clear priorities are essential for meeting agreed targets and maintaining SLA compliance across different request types.
-
Response and resolution targets: Set time commitments for each priority. These should be achievable with current resources and aligned with business tolerance for downtime or delays.
-
Support ownership: Define which teams are responsible for each service and how handoffs or escalations are handled.
-
Measurement and reporting criteria: Decide which metrics will be used to track compliance, how breaches are recorded, and how results will be reviewed over time.
With these points clearly defined, you can move into InvGate and translate them into SLA rules that the platform can automatically apply and monitor.
Building SLAs into InvGate Service Management is as simple as following just a few key steps. Ask for a 30-day free trial and harness the power of InvGate Service Management to build SLAs into your help desks!

How to create a service level agreement in InvGate Service Management?
Once you have outlined your SLA requirements, it’s time to incorporate the guidelines into InvGate Service Management. By doing so, these agreements will be aligned to your ticketing system and made clearly available to both agents and end-users.
InvGate Service Management allows you to create a multiple SLA policy in order to cater to different help desks and customer expectations within your organization. Nevertheless, the SLA creation process is pretty much the same in each case, and encompasses the following steps.
1. Choose the SLA type
The first step of the process is to choose the SLA type. InvGate Service Management lets you pick between resolution and first response agreements, depending on their purpose.
- Resolution SLAs outline the agreed time to solve a request.
- First response SLAs determine the acceptable period for agents to respond to a ticket after its submission.
- OLAs (or internal SLAs) are internal commitments between teams, often used to support customer-facing SLAs without exposing internal timelines.
To configure any of them, log in as an administrator and go to Settings > Requests > SLA. From there, select the SLA type you want to create and click Add.
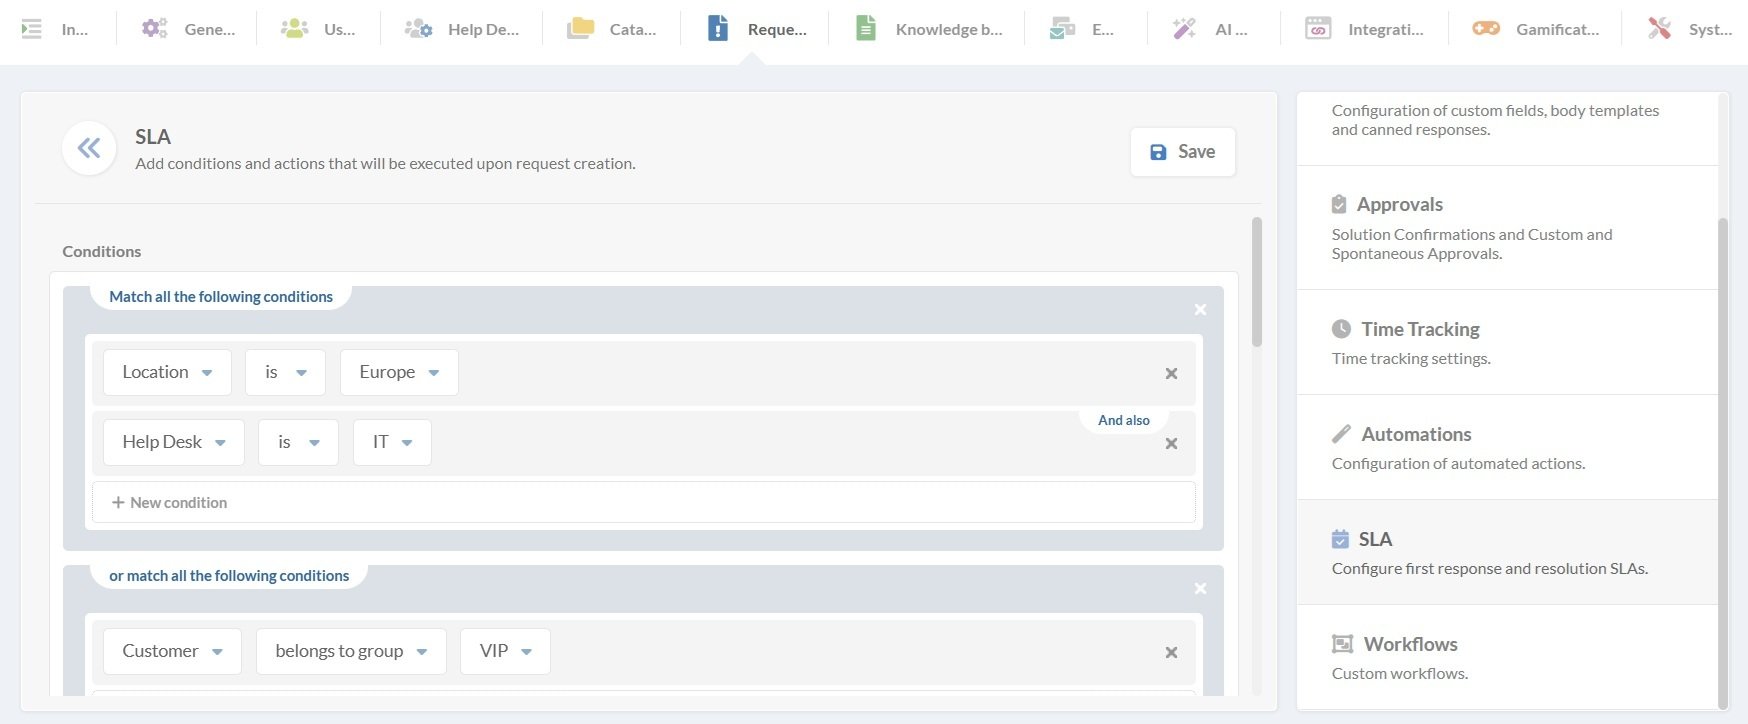
2. Define when the SLA applies and complete details
SLA conditions determine which requests the agreement applies to. Instead of assigning SLAs manually, you define rules so InvGate Service Management applies the right SLA automatically when a request matches those conditions.
For instance, you can choose among the following attributes:
- Category
- Priority
- Agent
- Customer
- Help desk
- Type
This will ensure that the agreement is applied to the right tickets, so that you can trust the information they recollect. You can combine these using groups of conditions to fine-tune the policy. For example, an SLA might apply to requests handled by the IT Support help desk and classified as High priority, but only for a specific location.
3. Configure timing and visibility
Afterwards, you need to fill in the SLA details, in particular:
- Name - Try to be as descriptive as possible, so it’s easier to spot the agreement later.
- Time - Set the SLA expiration time to match the maximum allowable duration for resolving or first responding to the request.
- Pausing criteria - Decide whether the SLA timer should be paused and specify in which scenarios this is permitted (for instance, you could agree to pause the SLA while waiting for customer input).
- Evaluate on change - You can enable this option to evaluate a different SLA if the request is modified.
- Log time - Choose whether to keep the elapsed time when modifying the request priority or conditions.
- Visible for customers - Decide whether to display an estimated expiration time for customers to view.
4. Using workflows as SLA conditions
Workflow-based conditions are intended for requests that follow an automated workflow, such as Change Management, onboarding, or approval-driven processes. These SLAs don’t apply to regular tickets unless a workflow is assigned.
In these cases, conditions can be based on:
-
Workflow fields, such as a custom field that identifies request type or urgency
-
Workflow stages, allowing the SLA to be evaluated or adjusted as the request moves through each phase
For example, a change workflow might include a field that marks a request as an emergency. That field can be used as an SLA condition so emergency changes follow shorter resolution targets than standard ones, while still remaining part of the same overall process.
5. Automate actions
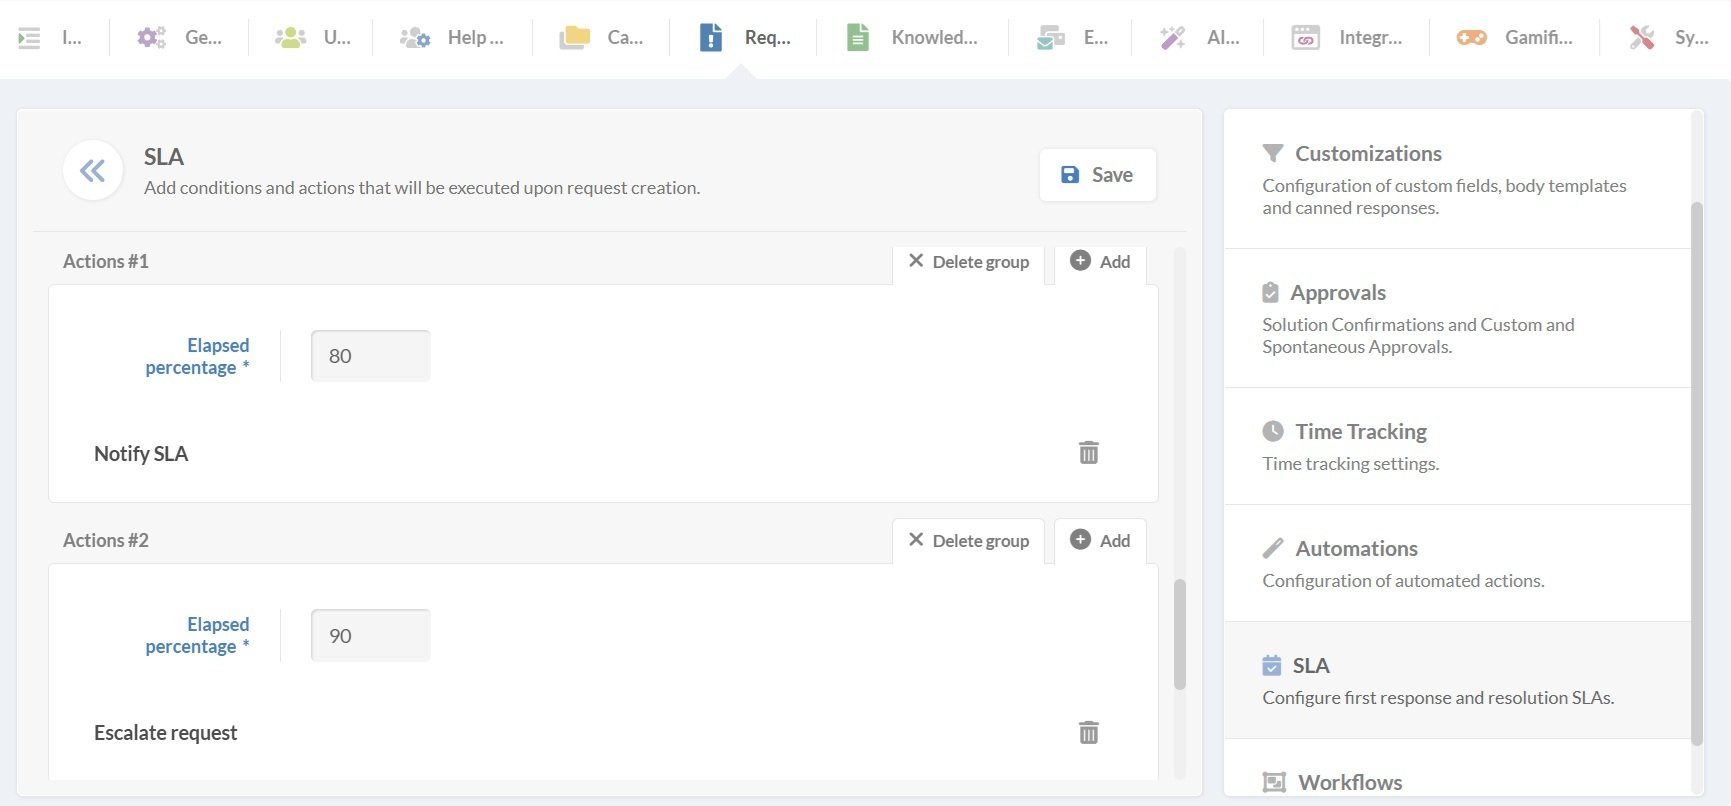
SLAs in InvGate Service Management can do more than just track time. You can be proactive in your support offering and leverage automation.
To do this, you will attach actions that run automatically when a certain percentage of the SLA has elapsed or when it expires.
Available actions include:
-
Reassigning or escalating the request.
-
Changing priority or category.
-
Sending internal notifications or emails.
-
Triggering approvals.
-
Calling web services for integrations.
For example, you might reassign a ticket to a manager once 75% of the resolution time has passed, send an email to the agent or manager when an SLA has been paused, or reassign the request if the first-response-time SLA is overdue.
6. Track and report on SLA performance
Once SLAs are active, reporting helps you understand how well teams are meeting their targets. In Reports > New > Requests, you can build reports that show total requests, expired response SLAs, and expired resolution SLAs.
Reports can be grouped by help desk or other criteria, expanded to view detailed request lists, and exported for further analysis. Scheduling reports by email also makes ongoing SLA tracking easier without manual effort.


