If your organization already uses Jira for software development or project tracking but lacks a service desk, then this is perfect to have the best of both worlds. The InvGate Service Management and Jira integration allows you to add a help desk to your Project Management and software development tools in just a few clicks.
As a result, you’ll be able to link any Jira issue to a service desk request, allowing quick access to detailed and real-time information on the Jira issue directly from InvGate Service Management – avoiding having to go back and forth between solutions.
Keep reading to see which Jira products can be connected and how to set up the integration!

Which Jira tools can be connected to InvGate Service Management?
The Jira products that are added to the list of InvGate Service Management integrations are:
- Jira (That combines what was formerly two separate solutions: Jira Work Management and Jira Software).
- Jira Service Management.
Regardless of the tool you choose to connect, the steps to integrate them and the way in which it works remain the same.
Jira vs. Jira Service Management
The three tools have distinct purposes and users, and it’s worth noting their differences before moving on to the integration itself.
- Jira enables teams to track and collaborate on different projects, aligning on goals and priorities. The solutions unifies functions that were formerly divided into two separate solutions: Jira Software (which organized work following Agile methodologies and was designed for software development and IT teams) and Jira Work Management (a simplified set of Project Management features aimed at teams other than developers).
- Jira Service Management supports the activities of IT and service teams related to managing service requests, incidents, and changes. It follows the ITIL framework and includes self-service and SLA capabilities.
Why integrate InvGate Service Management and Jira?
Combining the capabilities of these tools can help you further streamline your organization’s operations. In a nutshell, this integration works as a bridge between the support team and the development or Project Management teams.
The InvGate Service Management and Jira integration enables team members to seamlessly share information, improving communication and operational efficiency.
What’s really great about it is that users don’t need a Jira license to be able to access the details of the Jira issue on InvGate Service Management, so there’s no need for extra licenses.
In addition, InvGate’s ease of use and clear UX contribute to improving the agents’ experience. They now have all the information they need to deliver support accurately organized in one place.
How does the integration work?
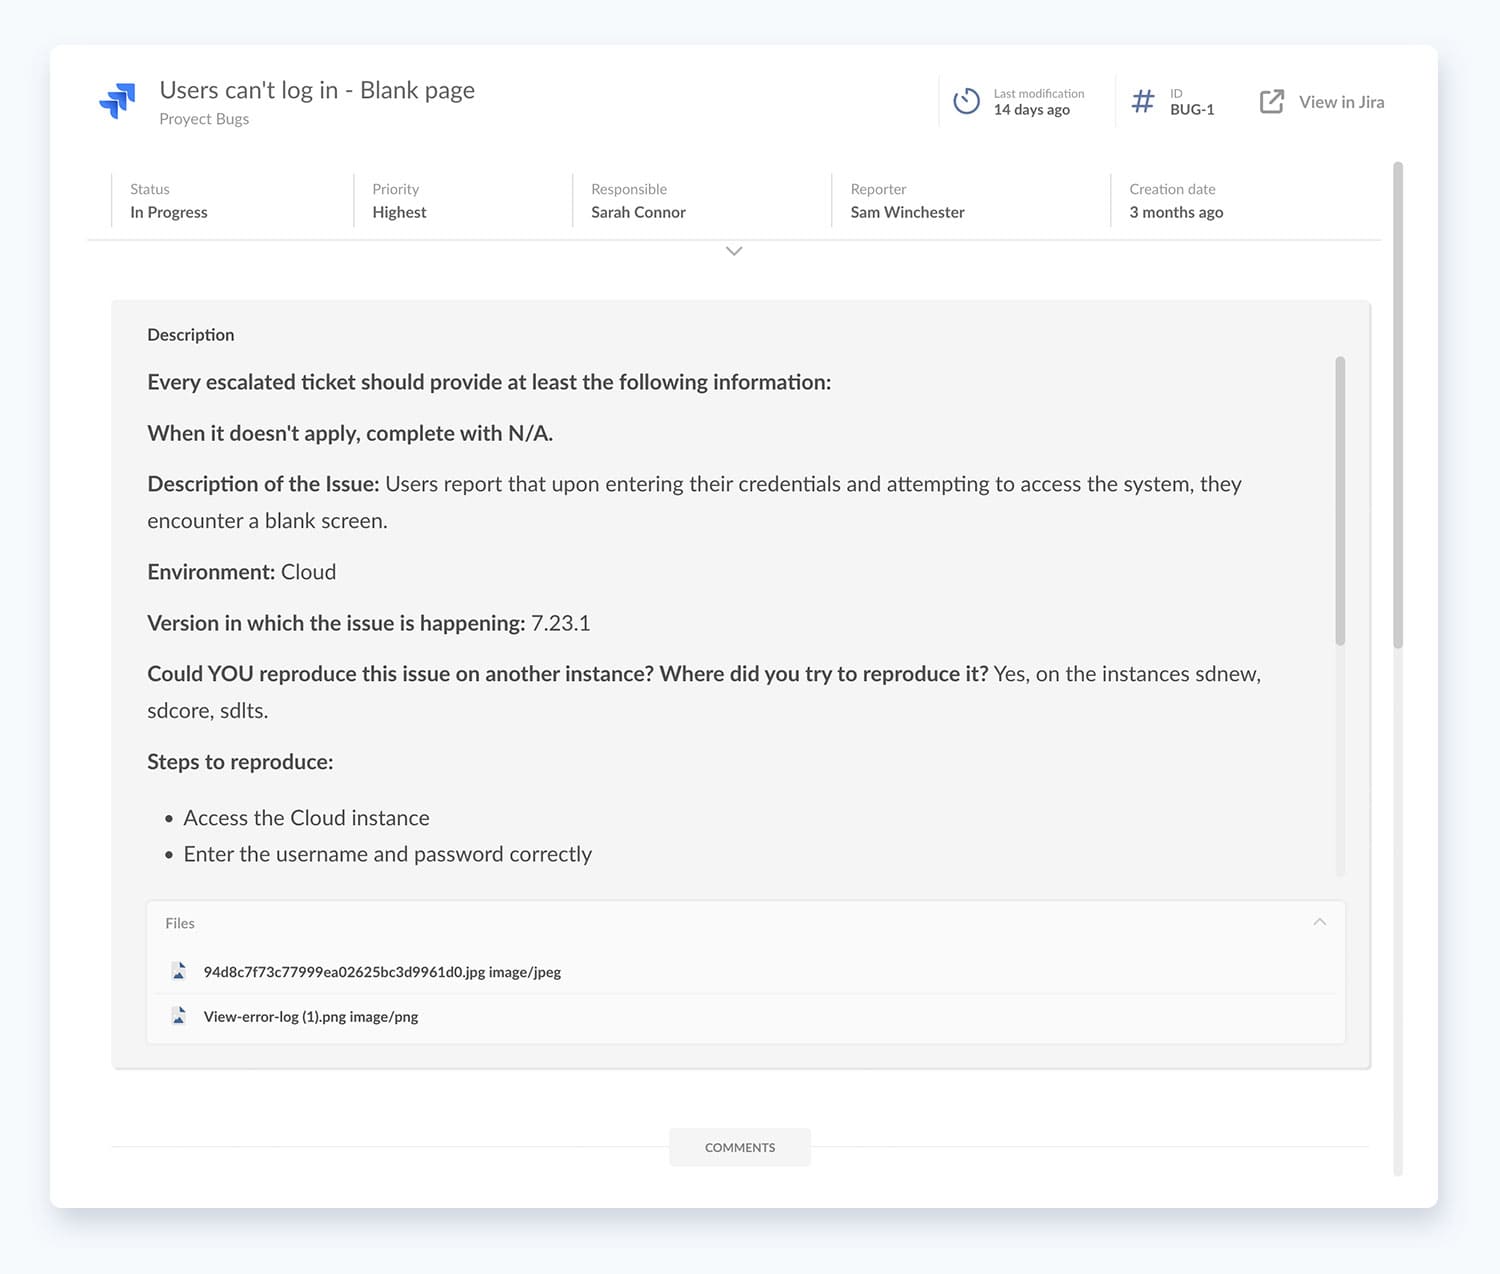
Once you connect the tools, you’ll be able to see on InvGate Service Management the following information about any Jira issue:
- ID
- Title
- Current status
- Description
- Person assigned to the issue
- Creation date
- Custom fields
- Public comments
On top of that, you can define in the configuration the help desk roles allowed to see the Jira issue related on InvGate Service Management (agents, managers, admins). This is particularly relevant to tailor the integration to your company needs and processes.
For instance, you can select that only admins can link a Jira issue to a service desk request, and that everyone can access that data once displayed in the ticket. Or you could grant everyone the capability to link the two and access the information.
How to configure the InvGate Service Management and Jira Integration
Configuring the integration between InvGate Service Management and Jira is a straightforward process. In this section, we'll guide you through step-by-step instructions to ensure a smooth setup.
For the purpose of this article, we chose Jira Software to illustrate the setup, but keep in mind that the configuration process is the same for Jira Work Management and Jira Service Management.
Now, let’s dive in.
Step 1: Obtain your Jira API token
In order to configure the integration, you must first obtain the API token from Jira. You’ll need it later on InvGate Service Management.
To do so, log into your Jira Software instance using an administrator account with the necessary permissions. Then, navigate to Settings >> Atlassian Account Settings and, in the security section, click on “Create and manage API tokens”. Finally, create a descriptive name for your API token, like "InvGate Service Management," and click on “Create.”
Step 2: Configure the integration
Next, log into InvGate Service Management as an administrator, go to Settings >> Integrations >> Applications, and click on the “Add” button for Jira Software to start the integration setup.
The integration screen will be divided into three sections:
- In the “Configuration” module, you need to provide a name to identify the integration, add a description, and precise the catalog categories from which Jira issues can be created or linked.
- In the “Authentication” section, you have to enter the Jira Software instance URL (up to .net), provide the email of the Jira Software administrator who created the API token, and input the Jira Software API token obtained in Step 1.
- In the “Permissions” module, you must define which users will have permission to link Jira issues to Service Desk requests based on roles (please note that each role includes the mentioned role and its superior ones; so, for example, “Agents” also includes managers, and administrators, and “Managers” also includes administrators).
Lastly, save the changes, and your integration is ready to use!
Ready to add a service desk to Jira?
If you have large teams working with a specific product brand, it’s crucial that every tool that enters your tech stack can work alongside them. By ensuring that they can be integrated, you’re contributing to increasing user adoption and thus expanding the tool’s ROI.
And that’s exactly the case with the InvGate Service Management and Jira integration. Teams that already use Jira or Jira Service Management can benefit from adding a help desk to it to improve collaboration and operational efficiency.
If you want to test this integration, you can ask for our 30-day free trial and see it for yourself!
